Installing & Setting up IBM Aspera for Desktop
Install IBM Aspera for Desktop and configure your browser so uploads and downloads work correctly in VIDA.
Overview
IBM Aspera for Desktop is a file transfer application used by VIDA to upload and download large media files across its products. It provides a faster and more reliable transfer experience than standard browser downloads, making it ideal for transferring high-resolution video, audio and other large files.
Before uploading or downloading files, Aspera for Desktop must be installed and your browser must be configured to allow communication with the application.
Step-by-Step Instructions
Step 1 — Install Aspera for Desktop
- Download the latest version of Aspera for Desktop compatible with your operating system.
- Run the installer and follow the on-screen instructions.
- Once installation is complete, launch the application.
After installation, Aspera for Desktop will automatically open whenever an upload or download is started from a VIDA product.
Step 2 — Allow browser permissions
The first time you start a transfer, your browser may ask for permission to communicate with IBM Aspera for Desktop.
You must allow this permission for uploads and downloads to work correctly.
Step 3 — Configure your browser
Follow the setup for the browser you use — Google Chrome or Safari.
Google Chrome — enable "Apps on device"
Google Chrome requires the Apps on device permission to detect IBM Aspera for Desktop.
To enable it:
- Open your VIDA application.
- Select the Site Settings icon next to the address bar.
- Ensure Apps on device is set to Allow.
- Refresh the page.
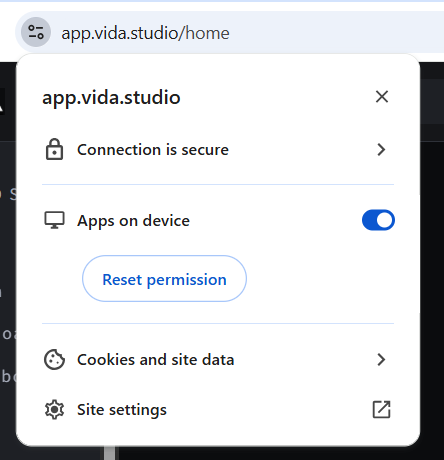
If this permission has previously been blocked, select Reset permissions, then refresh the page.
Google Chrome — allow communication with IBM Aspera for Desktop
When starting your first transfer, Chrome may display a message similar to:
app.vida.studio wants to access other apps and services on this device.
Select Allow.
For future transfers, you can tick Always allow to avoid being prompted again.
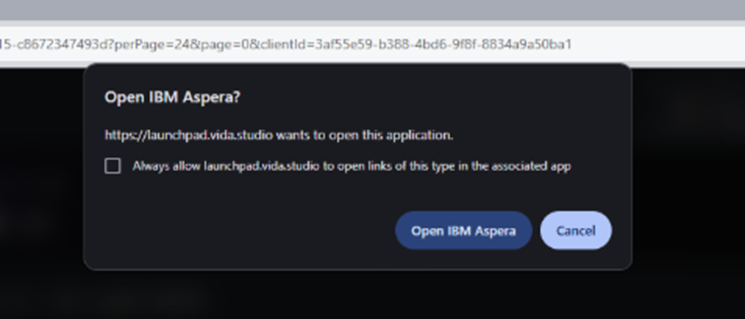
Selecting Block prevents your browser from communicating with IBM Aspera for Desktop.
Already selected Block or Cancel? See I clicked Block or Cancel by mistake in the FAQs below to get the prompt back.
Safari
Safari uses an IBM Aspera browser extension to communicate with the desktop application.
If transfers fail to start:
- Open Safari → Settings → Websites.
- Locate the IBM Aspera extension.
- Set your VIDA site to Always Allow.
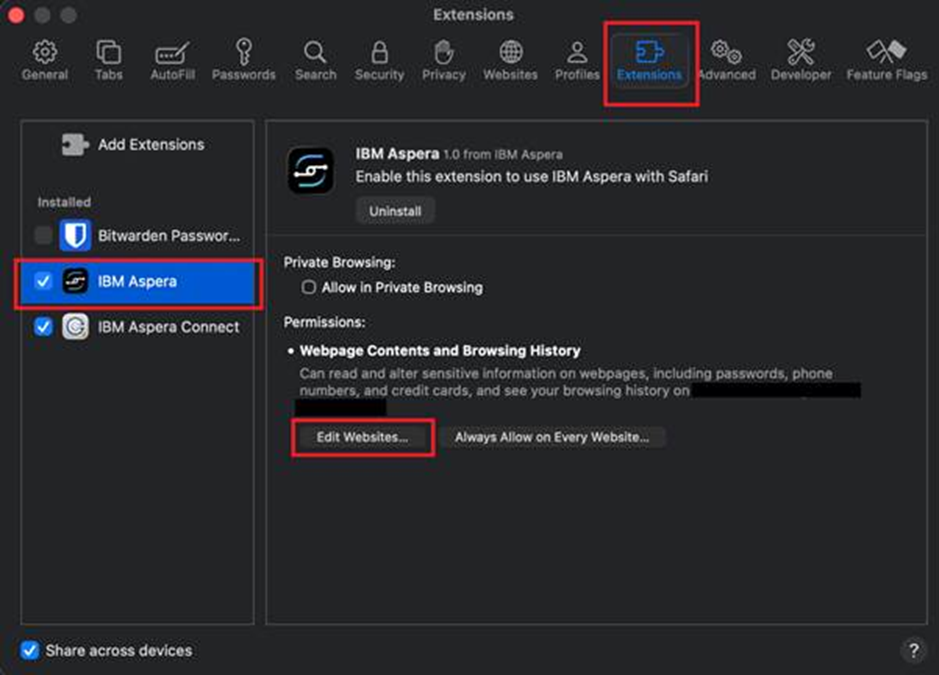
If both IBM Aspera Desktop and Aspera Connect are installed, disable the extension you are not using.
Optional Settings
Most users will never need to change the default Aspera settings. However, when troubleshooting, Support may ask you to make one of the following changes.
Change your default download location
- Open Preferences.
- Navigate to Transfers.
- Select a new default download location.
Disable multi-session transfers
VIDA does not currently support multi-session transfers. If you are experiencing transfer issues:
- Open Preferences.
- Navigate to Transfers.
- Make sure Enable multi-session is unticked.
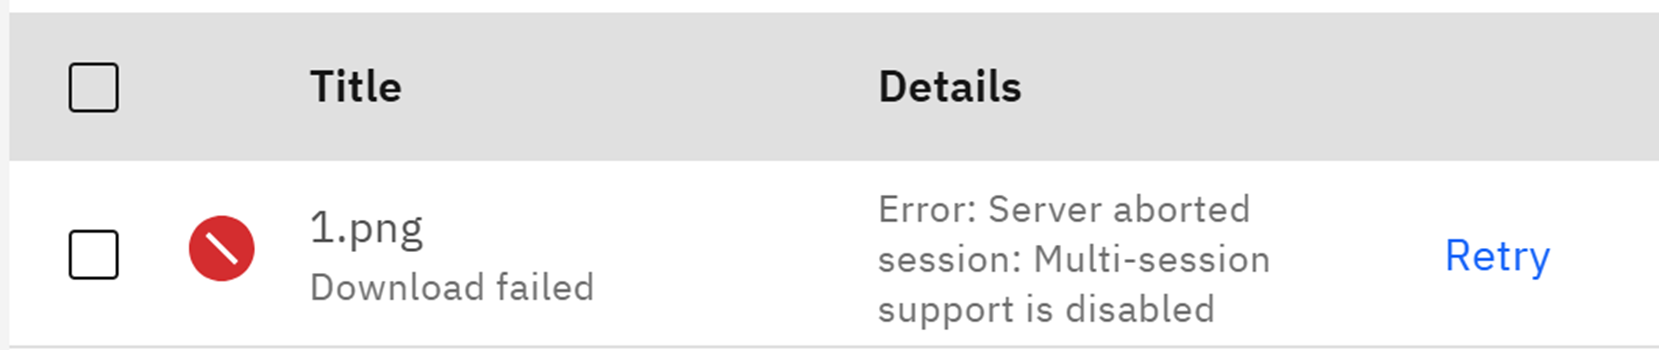
- Retry the transfer.
Reset Aspera preferences
Only make these changes if instructed by VIDA Support.
Troubleshooting & FAQs
Yes. IBM Aspera for Desktop is required for uploads on VIDA and Launchpad, and recommended for downloading large files from VIDA and Connect 2.
No. IBM Aspera Connect is no longer supported and is not used on any VIDA platform. You must install IBM Aspera for Desktop for uploads and downloads to work.
We recommend using the latest version of Google Chrome for the best experience.
Check that:
- IBM Aspera for Desktop is running.
- Apps on device is enabled.
- You allowed Chrome to communicate with the application.
- Your browser has been refreshed.
Chrome won't show the prompt again on its own. To get it back:
- Select the Site Settings icon next to the address bar.
- Find Apps on device and select Reset permission.
- Refresh the page and start a new transfer — the prompt will appear again.
Resetting Apps on device is what brings the prompt back — Chrome only asks about IBM Aspera for Desktop while that permission is allowed.
If your organisation's firewall may be blocking transfers, contact the VIDA Support Team for our network allowlist requirements.
If you're still experiencing problems, contact your VIDA admin or the VIDA Support Team with screenshots of the issue and details of your browser and operating system.
Related Articles
Was this article helpful?
That’s Great!
Thank you for your feedback
Sorry! We couldn't be helpful
Thank you for your feedback
Feedback sent
We appreciate your effort and will try to fix the article