Set up a passkey as your two-factor authentication method for VIDA, Launchpad, or Connect 2, and sign in using your device's built-in biometric sensor or PIN instead of a code.
Overview
A passkey lets you sign in to VIDA, Launchpad, or Connect 2 using your device's fingerprint sensor, face recognition, or PIN — instead of typing a one-time code by hand.
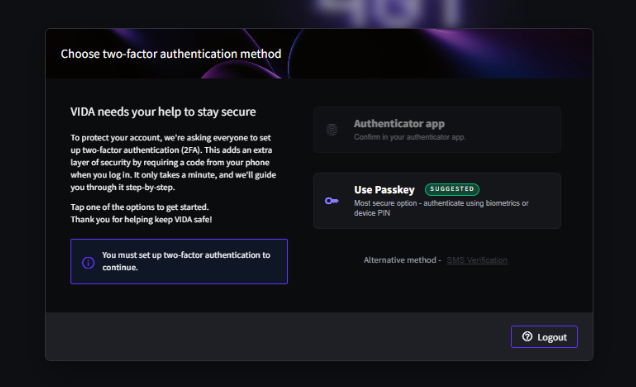
It's one of the ways to complete the two-factor authentication (2FA) setup VIDA asks for the first time you log in, alongside an authenticator app. VIDA marks Passkey as the suggested option because it's the fastest and most secure way to complete it.
None of VIDA, Launchpad, or Connect 2 use a password. Once you've registered a passkey, it takes over as your 2FA method for every future login — you'll confirm with your device instead of entering a code.
How a passkey works
A passkey isn't something you choose or type, the way a password is. When you register one, your device creates a matched pair of cryptographic keys: one half stays locked to your device and is never sent anywhere, and the other half is stored by VIDA purely to check that a login really is coming from your device. Because there's nothing to type or intercept, a passkey can't be phished, guessed, or reused if it ever leaked from an unrelated website's data breach.
Unlocking it is the same action you already use to unlock your device — a fingerprint, face scan, or PIN. VIDA never sees or stores that fingerprint, face, or PIN itself; your device only tells VIDA "yes, this is the right person."
Where your passkey is stored
VIDA doesn't store your passkey — your device's own password manager does, tied to whichever account you're signed into on that device. The three most common:
- Google — via Google Password Manager, synced across any device signed into the same Google Account (Android, Chrome).
- Apple — via iCloud Keychain, synced across any Apple device signed into the same Apple ID (iPhone, iPad, Mac).
- Microsoft — via Windows Hello, or the Microsoft Authenticator app if you want it to sync across devices.
This is why your passkey follows you automatically to your other devices when they're signed into the same Google, Apple, or Microsoft account — and why you're asked to scan a QR code (see Troubleshooting & FAQs below) when you try to log in somewhere that isn't.
Which devices and browsers support passkeys
Passkeys use an open industry standard (WebAuthn/FIDO2) built into every major device and browser, so there's nothing extra to install. Support includes:
- Windows 10 or 11, via Windows Hello (fingerprint, face recognition, or PIN).
- macOS and iOS, via Touch ID, Face ID, or your Mac/iPhone passcode.
- Android, via fingerprint or face unlock.
- Modern browsers, including Chrome, Edge, Safari, and Firefox.
If your device or browser doesn't support passkeys, choose Authenticator App instead on the 2FA method screen.
Before You Begin
- A VIDA, Launchpad, or Connect 2 account that has already been created — you'll have received a notification once it's ready.
- Access to the email inbox linked to your account, to receive your sign-in link.
- A device with a fingerprint sensor, face recognition, or a PIN already set up at the operating system level — for example Windows Hello, Touch ID or Face ID on Mac, or biometric unlock on Android or iOS. VIDA can't set this up for you; it uses whatever your device already offers.
- An up-to-date browser. Google Chrome is our preferred browser.
Step-by-Step Instructions
Step 1 — Log in for the first time
- Open the login page for the correct product using the link from your account-creation email.
- Enter your email address and select Login.
- Click the secure sign-in link sent to your inbox.
On your first login, VIDA prompts you to set up 2FA before you can continue.
Step 2 — Choose Passkey as your 2FA method
On the Choose two-factor authentication method screen, select Use Passkey — marked Suggested as the most secure option.
Step 3 — Start passkey registration
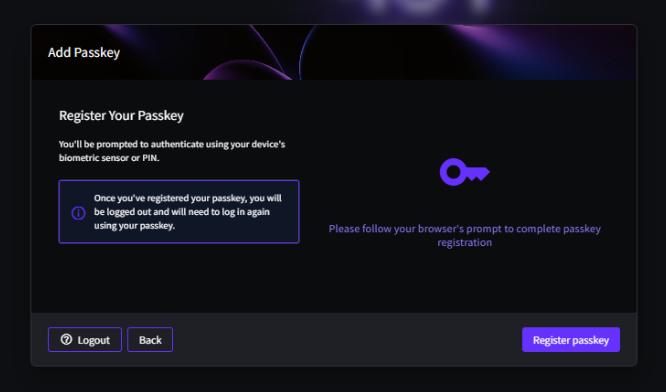
On the Add Passkey screen, review the note that you'll be logged out once registration completes and will need to sign back in using your passkey. Click Register passkey.
Step 4 — Complete registration with your device
Follow your browser's prompt and authenticate using your device's fingerprint sensor, face recognition, or PIN when asked. This step happens in your browser or operating system's own passkey dialog, outside VIDA.
Step 5 — Log back in using your passkey
Registering the passkey logs you out automatically.
- Go back to the login page and enter your email address, as in Step 1.
- When prompted for 2FA, follow your browser's prompt to confirm with your passkey — the same fingerprint sensor, face recognition, or PIN you just used to register it.
Your passkey is now your 2FA method for VIDA, Launchpad, and Connect 2. Every future login asks you to confirm with your device's biometric sensor or PIN instead of entering a one-time code by hand.
Troubleshooting & FAQs
No. VIDA, Launchpad, and Connect 2 don't use passwords. Your passkey takes the place of a code at login — or, if you set up 2FA with an authenticator app instead, that code still applies.
A device PIN works just as well — for example a Windows Hello PIN. You don't need a biometric sensor to use a passkey.
Make sure your browser is up to date and that a fingerprint sensor, face recognition, or PIN is already set up on your device at the operating system level — VIDA can't set this up for you. Try again in Google Chrome, our preferred browser.
This happens when you're signing in on a device or browser that doesn't hold your passkey — for example a work computer, a different browser, or an incognito window. Instead of confirming on that device, scan the QR code with the phone or computer you originally registered the passkey on, then approve the login there. This is a normal part of how passkeys work across devices, not a fault.
Contact your VIDA administrator or raise a support ticket to request a change to your 2FA method.
Contact your VIDA administrator or raise a support ticket. To help us investigate quickly, please include:
- A full-screen screenshot, including the browser and address bar.
- The exact error message shown, if any.
- Your email address.
- The time of the failed attempt.
- Whether this is your first login, or you've logged in successfully before.
Related Articles
Was this article helpful?
That’s Great!
Thank you for your feedback
Sorry! We couldn't be helpful
Thank you for your feedback
Feedback sent
We appreciate your effort and will try to fix the article