
Creating an Upload Package, Metadata & Uploading via Aspera
All content deliveries begin with creating an upload package.
To get started:
Log in to Launchpad
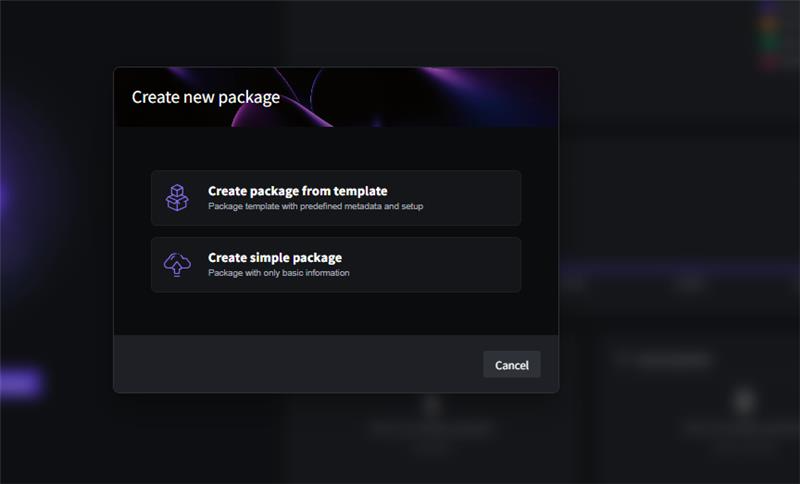
Select Create New Upload Package

Choose either:
Simple Package, or
Template (if one has been assigned to you
Upload packages allow you to add files and complete required metadata before submission.
Templates
Some clients assign templates to suppliers. These help standardise deliveries and may include:
Pre-configured metadata
Mandatory fields
Placeholders for specific asset types
Consistent structure for recurring deliveries
Important
Assets must be uploaded into the correct placeholder.
Uploading to the wrong placeholder may result in incorrect metadata and delays to ingest.
Metadata
Launchpad supports two ways to apply metadata:
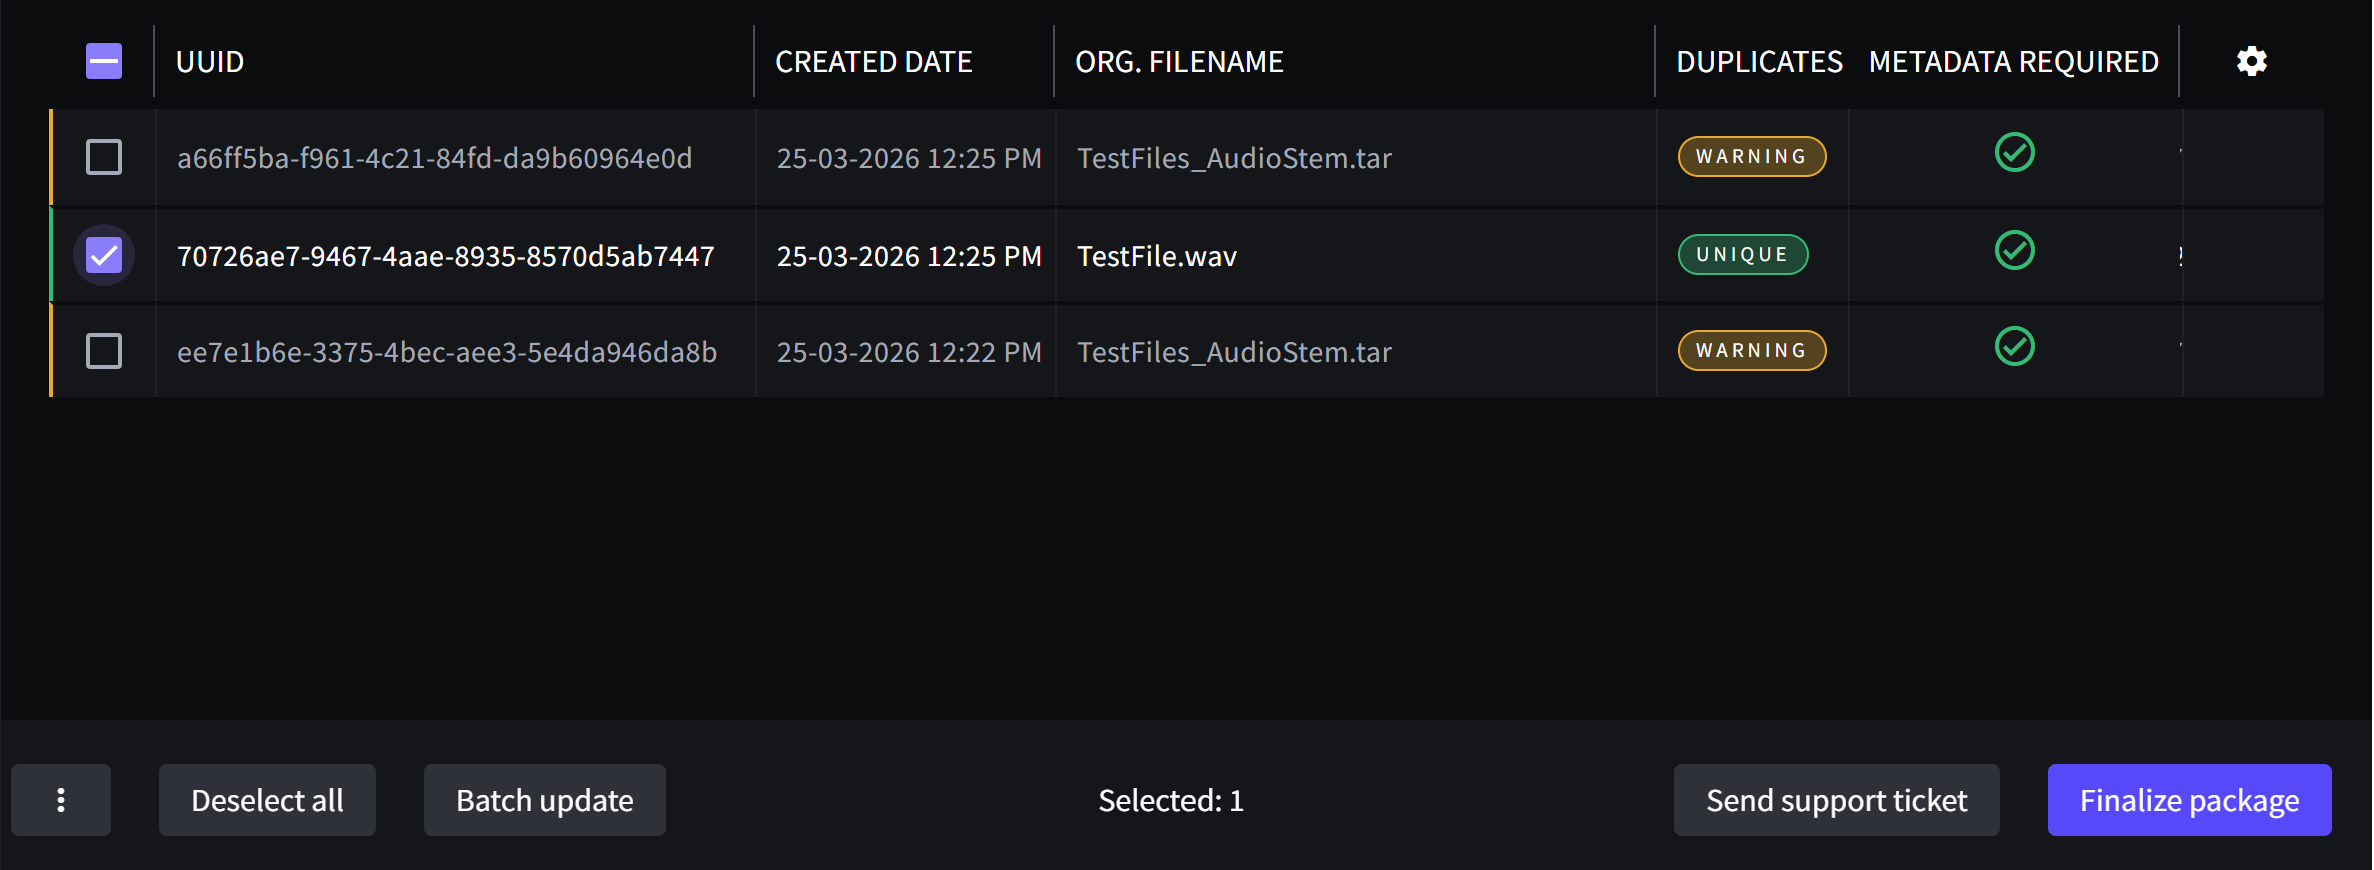
Batch Update – apply metadata to multiple assets at once
Single Edit – edit one asset at a time (use navigation arrows to move between assets)
Your client will define which fields are mandatory.
Guidance
Always follow metadata instructions provided by your client
Ensure Episode Numbers are accurate for series content
When delivering audio stems as ZIP files, include a clear delivery note describing the contents
Field types may include:
Text fields
Dropdown selections
Structured or mandatory fields
If required fields are missing or unclear, contact your client representative.
Uploading Files via Aspera
Launchpad uses Aspera for fast, secure file transfers.
To upload files:
Drag files into the placeholder area, or select Upload with Aspera
Install the Aspera client if prompted
Keep your browser open until all files have fully transferred
Once complete, all files will show as Received.
If you experience issues:
Check your network connection
Retry the transfer

Submitting Your Package
Once all files are uploaded and metadata is complete, the Send for Approval button will become active.
Important
Packages are not submitted automatically
You can use the finalise package button once all required metadta is popluation
One Finaised you must manually select Send for Approval

Self-Approve Mode
Some users may see Submit and Approve.
Selecting this will:
Immediately approve the package
Begin ingest into the client’s VIDA library
If you do not have this permission:
Your package will be sent to the client for review
The client will approve or reject the delivery
Package Statuses
During the delivery process, your package may show the following statuses:
Draft – Package is being prepared
Receiving – Files are uploading or being validated
Pending Approval – Awaiting client review
Approved – Ingest has started
Rejected – Changes are required
Expired – No action taken after rejection within the allowed timeframe
Rejections & Corrections
If your package is rejected:
You will receive an email notification
You have 7 days to take action
You may:
Update metadata, or
Re-upload corrected files (metadata does not need to be re-entered)
If no action is taken within 7 days:
The package will expire
A new package must be created and resubmitted
Best Practices
To ensure a smooth delivery:
Use the correct template when provided
Double-check all metadata before submission
Verify Episode Numbers for series content
Add delivery notes for ZIP files or complex assets
Keep your browser open during uploads
Contact your client if required fields are missing
Troubleshooting
Upload failures
Check your internet connection
Restart Aspera if prompted
Reopen the package and retry
Metadata not saving
Ensure all required fields are completed
Refresh your browser and try again
Contact your client if fields appear incorrect
“Send for Approval” not active
Confirm all files show as Received
Ensure all mandatory metadata is completed
Support
If you need help:
Use the Send Support Ticket button within your package
(this automatically includes package details for faster diagnosis)
Or contact your client representative.

Was this article helpful?
That’s Great!
Thank you for your feedback
Sorry! We couldn't be helpful
Thank you for your feedback
Feedback sent
We appreciate your effort and will try to fix the article